Hello Lovelies,
Well goodness me it felt good to write the title of this post. It's been soooo long since I have had a Bunny Mummy original pattern to share with you :0(
What do you think to my sweet little "granny" angel. I came up with the pattern last Christmas but didn't get around to writing it up.

In fact I didn't even jot it down for myself, except for her head, so there has been much scratching of my head while I tried to figure out how she was made. Silly me.
I do love to write a pattern post to store my creations, as well as share them with any of you lovelies who would like to make your own. I was determined to share this with you in early December so you can make some this year.

I've kept this pattern as simple as possible, so it's a speedy project that most of you with a little crochet knowledge should be able to complete in a couple of hours.
Because she is a suitable project for beginners I've taken the time to photograph each step. To give you the best chance of success. For you more experienced crocheters I'll write out the pattern at the bottom of this post.
Her body is simply a hollow cone of granny clusters and her head is made Amigurumi style, in a spiral.Don't worry if this technique is new to you. As I said, I will share lots of detailed instructions.
Apart from that there are just her wings, which again are not too tricky, though you could omit these or make some of felt if you prefer.

Anyway, are you feeling inspired? She would look great on your Christmas tree. Let's get started.
The pattern is written in my usual format.....U.S. terms.
Here is a list of the abbreviations used and a handy conversion guide for U.K. terms..........
sc= single crochet................................U.K. double crochet
hdc = half double crochet..................U.K. half treble crochet
dc = double crochet................................U.K. treble crochet
And they are the only stitches you need to know for this project.....is that O.K ? good ......lets get started then :0)
I've used double knitting ( worsted weight ) yarn .....it's my usual Stylecraft.........but you can use any weight with the appropriate hook size.......... gauge is not important.
Shall we begin with her head? It's worked from the top down. As well as your hook (I'm using a 4.00mm but be guided by your yarn) you will need some sort of stitch marker, I simply use a safety pin. You will also need a pen and paper to jot down what row you are up to.
To start chain 2

Insert your hook into the second chain from your hook.

and work 8 single crochet into this stitch, don't worry if the stitch opens up a lot as you work.

You can pull on the yarn tail to close it up again. This is round one complete.

The work continues in a spiral, so it's advisable to mark the first stitch of each new "round". In this photo I have made one stitch of round 2 and already marked it before I carry on.

I also write down the number of the row I've just completed on a scrap of paper. This is especially helpful if you need to break off at any point.
For Round Two work in the first stitch of round one *make 1 single crochet , then make 2 sc in the next stitch. Repeat from * around. By the end of this round ( when you reach the stitch marker again) you should have 12 stitches.

Round 3 Carry on moving up your stitch marker every time you start a new round. For this round make 1 sc in each of the next 2 stitches and 2 sc in the third. Repeat from * around ( 16 stitches)

This photo shows the start of Round Four . Work 1 sc in each of the next 3 stitches, and 2 sc in the fourth. Repeat from * around.

You should now have 20 stitches.

Rows Five, Six and Seven are simply 1 sc in each stitch around ( 20 stitches) Remember to keep moving up your stitch marker and making a note of your round, so you don't loose track of where you are.

You sound now have a nice little cup and it's time to start the decrease stitches that will make it into a ball shape.
Round Eight this round begins with *1 sc in each of the first three stitches, then 1 decrease over the following two stitches. Repeat from * around. ( 16 stitches).
Not sure about decreases...let me show you.
Insert your hook into the appropriate stitch and pull up a loop

Insert your hook into the next stitch.

Pull up another loop.


Round Nine is further decreasing. Start by making *1 sc in each of the first two stitches, then 1 decrease stitch across the next two. Repeat from * around. (12 stitches)
Round Ten is work 1sc in the first stitch, then one decrease over the following two stitches, repeat from * around. (8 stitches)

As you can see I stuffed my Angel's head at this point, but if you want to add safety eyes you will need to attach those first.

Right. How was that? I hope it was clear. Shall we carry onto the body of our Angel now?
This part of your angel is worked in rows so there is no stitch marker required. Yay.
To begin chain 4

Slip stitch into first chain to form a loop.

then chain 3 ( counts as first double crochet stitch of round one)

Work 11 more double crochet stitches into the loop, crocheting over the central yarn tail as you go.


At this point I pull on the yarn tail to close up the central hole

Round Two NB In all the rows of the body you work BETWEEN the stitches of the previous round.
Attach a new colour between two stitches of round one.
NB 2 I choose to do this just to the right of where the previous round finished, then it is easy to crochet over the ends as you work. I find this acceptable for decorative items but not blankets)

Chain 3 ( counts as first double crochet stitch.)

Make 1 dc into the same space.

1 dc into the following space, and 2 into the following space.

repeat around. Slip stitch into third chain of initial stitch and fasten off. ( 18 stitches)

Here I've turned my work upside down so you can see how I have been crocheting over my ends as I work. It's OK to just snip them off at the end of the round ( if there is any yarn still left)

Round Three Attach a new colour between the clusters of round two ( at the point a cluster may only be one stitch wide) Chain 3 and repeat round 2.


Round Four attach a new colour and chain three. make one dc in the same space and 2dc in every cluster space around. (26 stitches)

Round Five is a repeat of round four. remember to keep sewing over, then snipping off, those ends as you work. (26 stitches)

Round Six work in the same way as previously but make alternating two dc and 3 dc clusters. (30 stitches)

Round Seven this round has 3dc worked in every cluster space (36 stitches)

Round Eight This final round is the same as round seven ( 36 stitches)

fasten off and weave in any remaining ends.
Yay, our angel how has a head and a body. Time to add some features.

Time to have a rummage in my bead box.

oh look safety eyes which I had forgotten about.

These are 6mm safety eyes from here
I had to remove the stuffing to place these. I would not consider these to be safe for a young child when used with crochet, but this make is decorative and not suitable for use as a toy anyway.
Here we are, head re stuffed. I do love the way the reflected light adds some "life" to these eyes.

You could use shiny beads, or yarn french knots, or felt if you prefer. Or what about making closed eyes. Might look sweet.
Next onto her mouth. Cut a length of red or pink yarn and thread a yarn needle with it.

Make a big knot and insert the needle up through the stuffing.


insert your needle where the other corner should be, and come out at the middle point.

catch the loop under the yarn and pull up.

until your angel has a sweet smile.

then insert your needle just below the lips and fasten off out of sight.

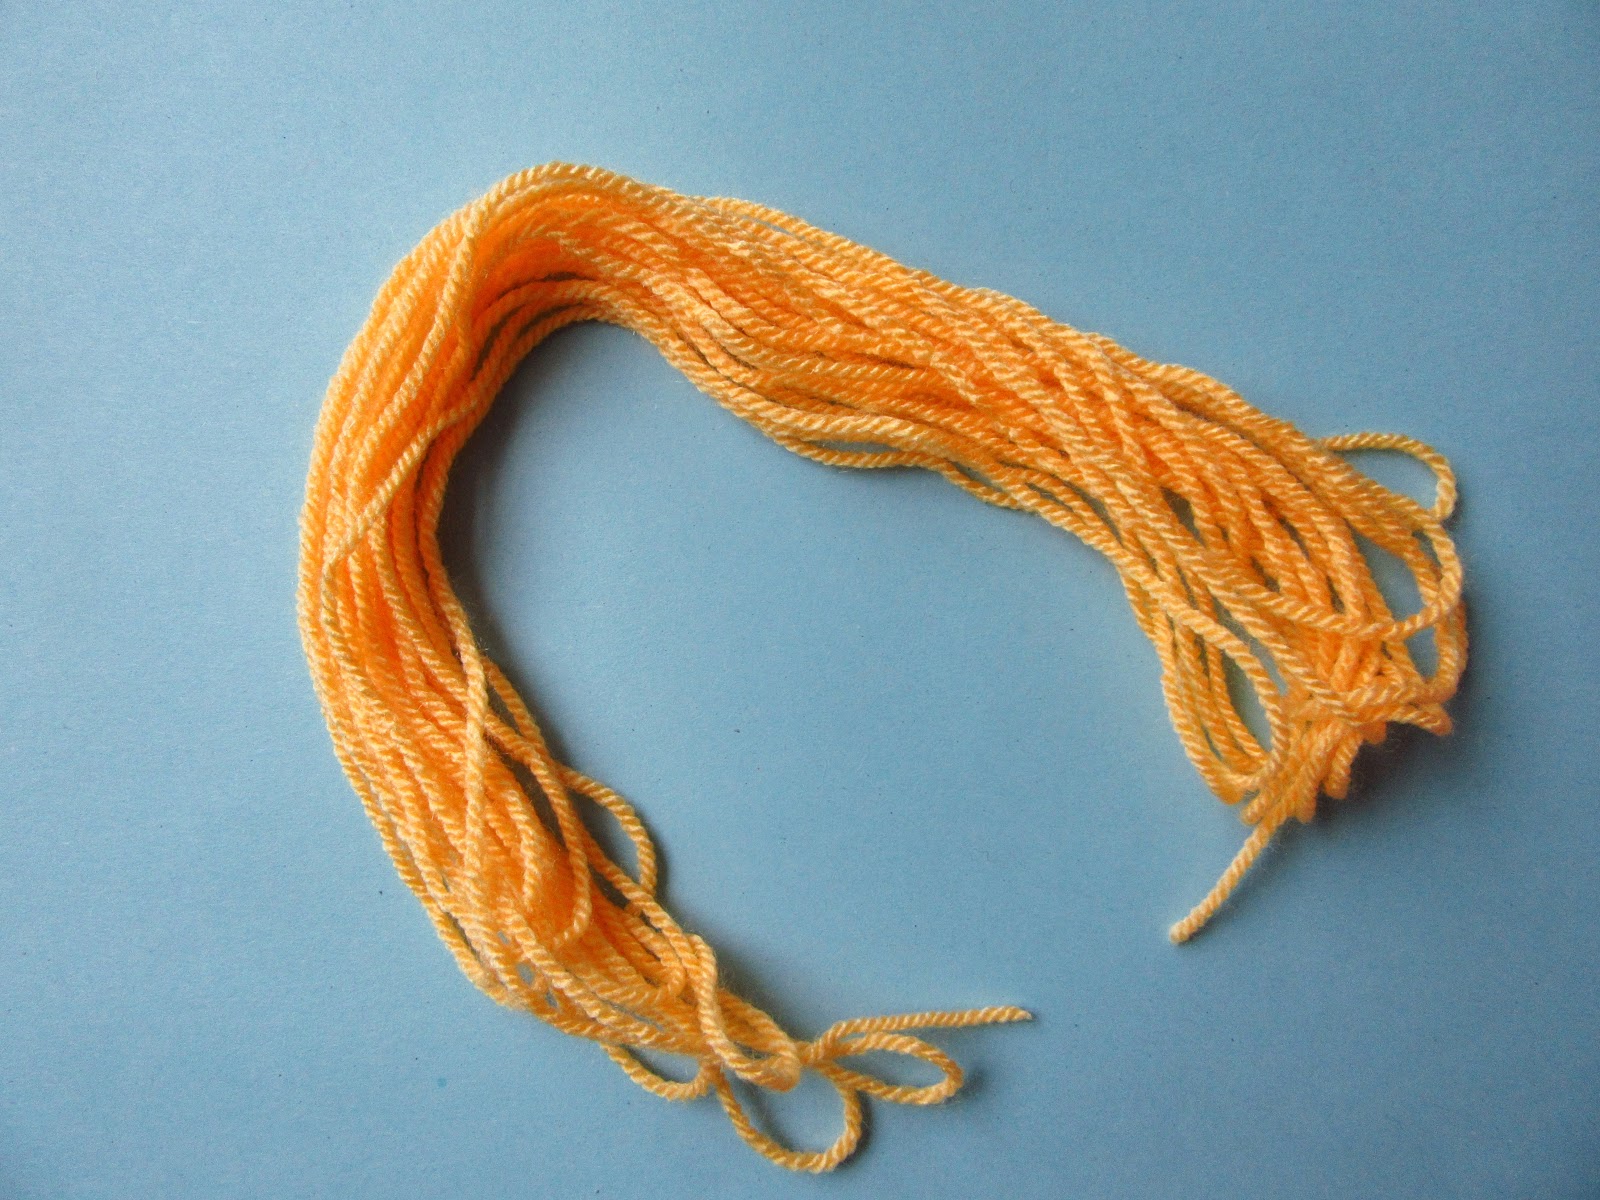
Next onto hair. You could choose any colour. Unwind about 25 lengths that are longer than you think you need. These are about 30 cm long.
Awww, she already looks so much cuter.

Attach the hair where you want her parting to be.

I back stitched it in place.


Then I closed up the gap in the bottom of her head with a running stitch.

And used the yarn tail to sew it onto her body.

I then created two "bunches" by sewing her hair in place low down on either side of her head, but other hair styles would be good too. Have a play around and see what you like best.

ooops fuzzy photo. Sorry.

Next you can use any sort of braid or a crochet chain to make your angel a halo. I had spotted this peal trim in my bead box earlier.

I've actually had this left over since I made my wedding dress in the late 80's. I stitched in in place with coordinating thread. I knew it would come in handy one day :0)

Here you are looking at the back of my Angel. I could have covered more of her head with hair really. I will try that next time.
Here I'm trimming the bunches, leave them long initially. You can always go shorter, but not vise versa :0)

I hope you are happy with how you little lady looks so far. All that's left are her wings, but as I said before. You could skip these, or make them out of felt if you prefer.
Any way, here's how they are made, it's not too tricky :0)
Start in the same way as you did when making her body. Chain 4 and slip stitch into first stitch to form ring. Work 11 dc into ring, do not join to starting chain.

Round Two. Turn work so wrong side is facing you and chain three. Working INTO the stitches of round one make 1 dc into the first stitch.

2 dc into each of the next 3 stitches.

In the next stitch make 2 half double crochet. Make 1 sc in each of the next two stitches. 2 hdc in the next stitch then 2 dc in each of the next four stitches.
Round Three Chain 3 and turn. Work 1dc in the same stitch then 2dc in each of the next six stitches, 1dc in the next two stitches, 1hdc in the next stitch. 1sc in the next stitch. At this point you should have completed one wing, now you just need to shape the second.
So in the next stitch make 1hdc in the next. 1dc in the following two stitches and finally 2dc in the remaining seven stitches. ( 35 stitches in total) YAY your wings should now look like this.

I gathered the middle of mine in a little and attached to the back of my angels body with the same coloured yarn.

And here she is. Her wonky smile adds character don't you think? :0)

and her sentimental halo works quiet well too :0)

As a final touch I gave her hair a little extra trim.

Here's the promised written pattern.
♥♥♥♥ Bunny Mummy's Easy Crochet Angel ♥♥♥♥
Head. Made from top down. Work in a spiral, marking each row as you start it.
Ch 2
round 1 make 8sc in 2nd ch from hook.
round 2 alternate 1 sc, 2sc around (12 stitches)
round 3 (1sc, 1sc 2sc )repeated (16 stitches)
round 4 (1sc, 1sc, 1sc, 2sc )repeated (20 stitches)
rounds 5-7 1sc in each stitch around ( 20 stitches)
round 8 (1sc, 1sc, 1sc, 1 sc decrease) repeated around (16 stitches)
round 9(1sc, 1sc, 1sc decrease) repeated (12 stitches)
round 10 (1sc, 1sc decrease) repeated ( 8 stitches)
Leave a long yarn tail to sew head to body.
Body. Made in circular rows. Choose a new colour each row, or stay with the same colour if you prefer. Crochet over yarn tails as you work.
Ch4 slip stitch in first chain to form ring
round 1 ch3 ( counts as 1st dc) work 11 dc into ring. Slip stitch into third chain of initial ch3 and fasten off.
round 2 Working BETWEEN stitches of previous round, sl st to attach a new colour at any point in ring. Ch3 and make 1dc in same space. *Make 1dc in next space, 2 dc in next space. Repeat from* around (18 stitches)
round 3 repeat round 2 ( 18 stitches)
round 4 made in same way as previous rows but with 2dc in every cluster space (26 stitches)
round 5 repeat round 4 (26 stitches)
round 6 alternate 3dc and 2 dc in spaces around (30 stitches)
round 7 3dc in every space around (36 stitches)
round 8 repeat round 7.
Wings. these are made in three rows attached to a ring, with different height stitches to shape. Stitches are made INTO stitches of previous round.
Ch4 slip stitch in first chain to form ring.
round 1 ch3 (counts as 1st dc) work 11 dc into ring, do not join to first stitch.
round 2 ch3 and turn. Work 1dc in same stitch. 2dc in next three stitches, 2 hdc in next stitch. 1sc in next two stitches, 2hdc in next. Final four stitches need 2 dc in each.
round 3 ch3 and turn. Work 1dc in same stitch. 2dc in the next six stitches. 1 dc in the next two stitches. 1 sc in the next stitch. 1 hdc in the next stitch. 1 dc in the next two stitches. 2dc in the final 7 stitches. ( 35 stitches in total...don't worry if you are slightly out :0) )
fasten off and weave in ends.
Please refer to my photo tutorial for assembly instructions :0)
♥♥♥♥♥♥♥♥♥♥♥♥♥♥♥♥♥♥♥
Your Angels will all be different and I'd just LOVE to see them. Maybe if you use Instagram you could use #bunnymummyangel or you could leave me a a comment or a link here.
Happy Christmas and Happy Crocheting with love from me
Jacquie xxx
ps. This has taken an age and I'm feeling a little befuddled, so please let me now if you spot any errors. Thank you ♥
Jacquie that is one awesome tutorial. She is a beauty, I really like the wings. I would make one all in white. Popping that on my quickie presents list for next year, Jo xxx
ReplyDeleteThis comment has been removed by the author.
ReplyDeleteBeautiful, thank you Jacquie !! Will try this weekend!!
ReplyDeleteShe's brilliant Jacquie, and an amazing tutorial. Nicely done! CJ xx
ReplyDeleteThank you for sharing the tutorial! Lovely little angel!
ReplyDeleteThank you very much!
ReplyDeleteThank you so much Jacquie!That really must have taken an age to write up.
ReplyDeleteI think I might make one in white as well.
Tina X :-)
Thank you she is lovely!
ReplyDeleteShe is so cute and have book marked to make at a later stage. You are so clever Jacquie xoxo
ReplyDeleteShe's a very sweet little angel.. bravo to you to write it up!
ReplyDelete*********************************************
*H*A*P*P*Y* * *H*O*L*I*D*A*Y*S*!*!*!*
*********************************************
((hugs)), Teresa :-)
Complimenti bellissimo lavoro!
ReplyDeleteUn caro saluto, Maria
She looks very cute, hoping when kids are off school I may have enough time to try and make one or two. thanks Rue
ReplyDeleteShe's a lovely wee angel. Might have to make one soon.
ReplyDeleteJacquie she is so cute, shall have to make one very soon. I haven't been online for a while and missed your blogg. So nice to come back and find this gorgeous little angel. Thanks so much for sharing. Happy and blessed Christmas to you and uour family xxxz
ReplyDelete